Saturday, October 29, 2011

Scanography & Edge Effects

Mirror Image of Flowers. Spori Building, Rexburg, ID. 4:00 PM. 10/29/2011. Epson Expression Scanner 10000 XL, 300 dpi

Frame 1.  Spori Building, Rexburg, ID. 4:30 PM. 10/29/2011. Epson Expression Scanner 10000 XL, 300 dpi
Frame 2.  Spori Building, Rexburg, ID. 4:33 PM. 10/29/2011. Epson Expression Scanner 10000 XL, 300 dpi
Frame 3.  Spori Building, Rexburg, ID. 4:35 PM. 10/29/2011. Epson Expression Scanner 10000 XL, 300 dpi


Hall of Frames.  Spori Building, Rexburg, ID. 5:00 PM. 10/29/2011. Epson Expression Scanner 10000 XL, 300 dpi

I was kind of hesitant to try scanning images to make a picture. Once I understood how to use it, it was really fun. I wanted to try all these different dpi levels and scanned images. When it came to figuring out how to make a collage of images in Photoshop I was unsure of how to start. I thought about creating a wall of frames, but this abstract version is more appealing to me. It's different and you don't see something like that everyday. How I did it was by mistake. I tried to cut out the image using the wand tool and it wouldn't select all of it. Then I put a couple of them together, changing the sizes and arrangement of the frames and I was pleased with the layout.

Knock.  Bannack Montana, MT. 5:00 PM. 10/20/2011. F/4.0, 1/400,  ISO 100, Cannon PowerShot Sx30 IS Edits: Brightness/Contrast, Vibrance/Saturation, Hue/ Saturation


Knock Edit. Custom Images Tutorial # 14, Flexible Vignette

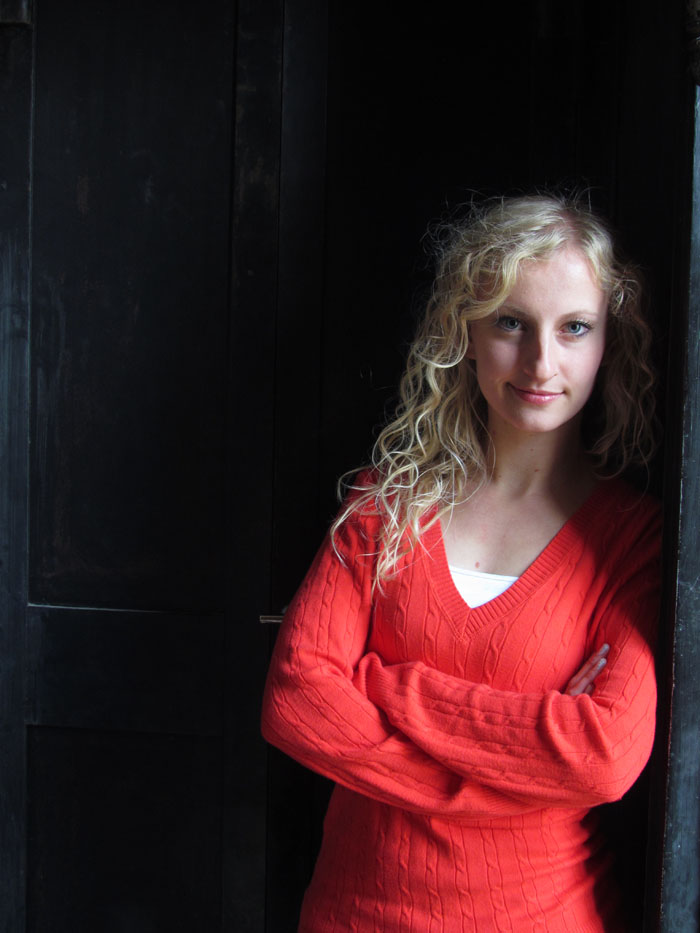
 Striking a Pose  Bannack Montana, MT. 3:40 PM. 10/20/2011. F/3.5, 1/400,  ISO 100, Cannon PowerShot Sx30 IS Edits: Brightness/Contrast, Vibrance/Saturation, Hue/ Saturation
Striking a Pose Edit. Custom Images Tutorial # 12 Double Fade Border
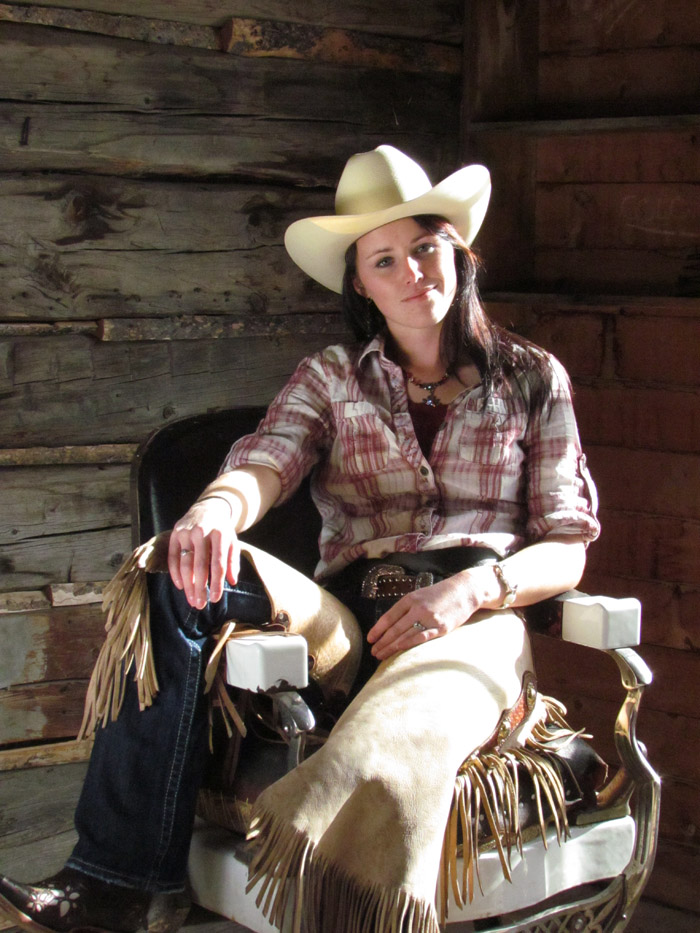
Cow Girl Up.  Bannack Montana, MT. 2:30 PM. 10/20/2011. F/5.0, 1/800,  ISO 800, Cannon PowerShot Sx30 IS Edits: Brightness/Contrast, Vibrance/Saturation

Cow Girl Up Edit. Custom Images Tutorial # Flexible Brushed-on Effect. For this one I couldnt find the "thick, heavy brushes" So I used the one called Heavy Marker Small Tip with varying opacity.

I liked learning about adding different borders because this just makes your custom image that much more custom and unique. This is also good to know if I ever have to make a invitation or custom card. Borders also enhance more to a portrait than a image of a object.


Saturday, October 22, 2011

Bannack's Best


Reflection Bottles. Bannack, MT, late afternoon 10/20/11 - f/2.7, 1/200 , ISO 100
Cannon PowerShot Sx30 IS 


Home on the Range. Bannack, MT, late afternoon 10/20/11 - f/5.6, 1/200 , ISO 200
Cannon PowerShot Sx30 IS 


Truck Time. Bannack, MT, late afternoon 10/20/11 - f/5.6, 1/200 , ISO 100
Cannon PowerShot Sx30 IS 


Joseph's Waggon. Bannack, MT, late afternoon 10/20/11 - f/7.1, 1/500 , ISO 400
Cannon PowerShot Sx30 IS 


Autumn Sunset. Bannack, MT, late afternoon 10/20/11 - f/4.0, 1/500 , ISO 200
Cannon PowerShot Sx30 IS


Mason. Bannack, MT, late afternoon 10/20/11 - f/5.0, 1/50 , ISO 100
Cannon PowerShot Sx30 IS 


Melody. Bannack, MT, late afternoon 10/20/11 - f/3.2, 1/4 , ISO 100
Cannon PowerShot Sx30 IS 

This was a really fun trip to Montana.  I enjoyed taking all these photos. I feel like I'm getting better at my photography skills. I had a little trouble at first learning the Aperture and Shutter Speeds for different types of photos we were going for. I finally got the hang of it, but still need a lot of practice. All of these photos in this post are edited in Photoshop and Camera Raw. With these edits, it makes a beautiful picture. 


Light Painting

Hotel Meade. Bannack, MT, night, 10/20/11 - f/5.6, 6.0 , ISO 100
Cannon PowerShot Sx30 IS 

It's incredible what a difference Photoshop can make! The intensity of the blue and the orange really compliment each other. Bringing the blacks out in the piece also added the night time feel.


Boots. Bannack, MT, night, 10/20/11 - f/8.0, 6.0 , ISO 800
Cannon PowerShot Sx30 IS 
This was done with a 10 second timer and a high Shutter Speed in order to capture the light. Just to add to the overall subject I just brightened it up so you could see what was on the table.


 For light painting a flashlight was used in the previous pictures above to accentuate the subject. With a fast shutter speed we were able to capture the light on the building as if it was already there. 


High Dynamic Range (HDR)


Road to No Where. Bannack, MT, late afternoon 10/20/11 - f/5.6, 1/1600 (-2) , ISO 100
Cannon PowerShot Sx30 IS 

Road to No Where 2. Bannack, MT, late afternoon 10/20/11 - f/5.6, 1/400 , ISO 100
Cannon PowerShot Sx30 IS 

Road to No Where 3. Bannack, MT, late afternoon 10/20/11 - f/5.6, 1/80 (+2) , ISO 100
Cannon PowerShot Sx30 IS 

Photomatix HDR blend 

Treasure Trunk. Bannack, MT, late afternoon 10/20/11 - f/5.0, 0.3 , ISO 100
Cannon PowerShot Sx30 IS 

Photomatix HDR Edit    

 It was really interesting to try HDR with Photomatix. It really makes a difference to your picture. It adds that artistic touch and can make any sky look beautiful.


Macro Abstract

Macro knob. Bannack, MT, mid afternoon 10/20/11 - f/4.0, 1/13 , ISO 100
Cannon PowerShot Sx30 IS 

Macro Texture. Bannack, MT, late afternoon 10/20/11 - f/4.0, 1/500 , ISO 100
Cannon PowerShot Sx30 IS 

Texture & Macro Blend      


 I think the overlay really added to the door knob and made it look even better. Now it looks more antique and the feel what I was going for. I had to overlay the rusted texture twice because it was landscape and the door knob is portrait so it wouldn't fit. I was able to mask it out so you don't see two different pieces.


Reverse Shallow Depth

Reverse Depth. Bannack, MT, mid- afternoon 10/20/11 - f/4.0, 1/500 , ISO 100
Cannon PowerShot Sx30 IS 
Camera Raw edit. All I did for this one was, adjusted the light and contrast to get a better color change between the fence and the building on how I saw it that day in Bannack.


Reverse Depth 2. Bannack, MT, mid afternoon 10/20/11 - f/4.0, 1/1250 , ISO 100
Cannon PowerShot Sx30 IS 
Same with these one. I was able to bring out more features in the building because it is the reverse depth of the previous picture. 

 This type of photography is something I still need to work on. Getting your camera's aperture just right and knowing when to use a tripod is key. I need to be able to learn those things first so I will be able to add a blurry foreground or background to enhance my subject.


Action Blur & Freeze

Ghostly Rebekah. Bannack, MT, early afternoon 10/20/11 - f/8.0, 2.0 , ISO 80
Cannon PowerShot Sx30 IS 
Photoshop edit. For this one I intensified the brightness of the piece so one could tell the hallway was yellow. I also cut out the guy in the back corner to seem more ghostly. As far as the colors go I think I could of gone really dark or really bright depending on the feel I was looking for.

Ghost Jumper. Bannack, MT, early afternoon 10/20/11 - f/2.7, 1/400 , ISO 400
Cannon PowerShot Sx30 IS 
Doing a freeze shot was a little harder to do. To find out what shutter speed worked the best. After a few tries and a lot of jumps I was able to capture her in mid air. 


 Being a beginner I feel like some of this is based on luck, until you know what you are doing and understand photography. So I consider myself lucky to have been able to get cool shots.


Bannack Portraits

Thane the Cowboy. Bannack, MT, early afternoon 10/20/11 - f/4.5,1/80 , ISO 800
Cannon PowerShot Sx30 IS 
Photoshop edit. This was already a great shot, I didn't have to make a lot of enhancements to it. I just warmed up the light on his face and on his shirt.  


Rebekah. Bannack, MT, late afternoon 10/20/11 - f/5.6, 1/200 , ISO 100
Cannon PowerShot Sx30 IS
Rebekah is already natrually pretty. I didn't need to make a lot of changes either. I just wanted her to be the central focus. I toned down the light so it would add to the darkness of the background.
Rebekah 2. Bannack, MT, early afternoon 10/20/11 - f/4.0, 1/15 , ISO 100
Cannon PowerShot Sx30 IS 
I really liked this angle of the shot and the dark background makes her the central focus. I just added the same enhancements has previously mentioned.  

 After doing this weeks portraits with practice of last weeks portraits, I got a good feel of body composition so my subject is the dominant feature of my picture.


Sunday, October 16, 2011

Portraits

Kylie. 10/12/11.6:25 PM; Rexburg, ID.; F4.0, 1/15, Canon Powershot A590
  
Photoshop Edit

Kylie 2. 10/12/11, 6:20 PM; Rexburg, ID;  F5.6, 1/8, Canon Powershot A590

Kylie 3. 10/12/11. 6:31 PM; Rexburg, ID; F5.0, 1/4, Canon Powershot A590
Michelle. 10/12/11. 6:57 PM; Rexburg, ID, F5.6, 1/10, Canon Powershot A590


Group Pose. 10/12/11. 6:57 PM; Rexburg, ID; F5.6, 1/25, Canon Powershot A590
Camera Raw Edit
Group Pose 2. 10/12/11. 6:48 PM. Rexburg, ID. F4.0, 1/4, Canon Powershot A590

Photoshop Edit
Environmental. 10/11/11. 9:30 AM. Rexburg, ID; F2.6, 1/30, Canon Powershot A590
 Camera Raw Edit

Michelle Edit. 10/14/11. 11:00 AM. Rexburg, ID; F3.5, 1/60, Canon Powershot A590

Photoshop Edit
Replace Color. 10/14/11. 1:30 PM. Rexburg, ID; F 5.5, 1/160 Nikon DSLR


Photoshop Edit

Match color. 10/12/11. 6:29 PM. Rexburg, ID; F5.0, 1/60 Canon Powershot A590

 Replace Color Edit. 10/12/11. 6:36 PM. Rexburg, ID; F3.5, 1/5, Canon Powershot A590
Edited Version 


 There was allot to do to portraits. I had no idea! Photographers can have their hands full with just this. I enjoyed learning more about people and composition. Knowing what light to use, places to position for a picture, and what features like the background look good for working with different people. Allot of my pictures were taken at night so it was harder to see them. I'm glad Photoshop was there for me to be able to edit them and see their potential.